

Showing posts with label tips. Show all posts
Showing posts with label tips. Show all posts
Tuesday, March 11, 2014
Wednesday, March 20, 2013
Down Lights - Lesson Learned
Well, today I just realized that we have make a mistakes by purchasing the wrong designed down lights for our toilets, which make a hassle when changing the light bulbs. No worry, I will be upgrading soon. So below are the 2 comparison.
 This (above) is the ones that we had currently, as you can see above the way the light bulbs are inserted, horizontally, well this makes it difficult to replace the light bulbs, what I can say and why it is design in this manner, our housing design are getting lower and lower in term of the ceiling heights, I guess you know what they do that?. So with the ceiling so low they have to make the light not to protruding at the top end when i normally covered with the ceiling boards. Therefore they invented this design, basically following the scale of economics, demands.
So if you can, try to get the ones below, where you can just plug in the bulbs from below. Nice and easy.
 Pictures and brand names are property of its respective owners. I am here just to share and show some example.

So if you can, try to get the ones below, where you can just plug in the bulbs from below. Nice and easy.

Sunday, March 17, 2013
Gimp boost colors and contrast with blend modes

Before

After
So here are the steps, after reading Digital SLR Photography for APril 2013. I somehow tried this on GIMP, of course you cannot compare the powers of the Adobe Lightroom, or rather I would say a easier way to completed those changes. Well, GIMP is FREE, and also capable of achieving the same results.
So here,
1. Open your photos
2. Click duplicate at the bottom of the tool palatte
3. top menu - colors -> hue-saturation, on the hue slide all the way down to 0 and play around with the Lightness
4. on the layers - choose Overlay (75% opacity) as the blending mode.
5. merge the photos and done
What i like about the above is that, it make the photos separate the skies and the building, this is more 3D and realistic.
Try it!
Tuesday, March 12, 2013
2013 Playground - camera findings - tutorials

So, quick to the findings. As I browse around the Menu->Autofocus.
AF-S priority selection and AF-S priority selections - this are basically settings to tell the camera not to snap when it is not in focus, or just snap? Choose.
Now then this one below, remember we are still at Autofocus menu. Item *a3 - still wonder what those * for. So This one is really important.
This selection will determined the delays when you move your camera to point/focus at other place. For example, you are shooting at your girl friend and then there is another pretty girl at the back to you wanted to capture her, now there are 1 to 5 delays here and OFF. For OFF the camera will focus immediately when you half press the shutter button. For 5 - it will wait for 5 sec then it sill only focus. I choose OFF of course, as you do not want the pretty girl to get away, ya? Simple.
Still I have do idea why people would choose 5 for this? any tips?
Now, at a8 - LiveView/Movie Mode, you have 2 options here. Autofocus mode (AF-F and AF-S). The usage is simple, when ever you pan your camera while shooting video and wanted to have so called like camcorder, then choose AF-F ( full time servo) if you are shooting manual, then choose AF-S. But for me, I think better choose AF-S and manually focus, cos this is still not up to the camcorder standard. Not sure about Canon on this one, anyone care to share?
Then here also , there is AF-Area mode, where you can set Face priority, Wide Area AF, Normal area AF and subject tracking AF. Well i assure you that face and subject tracking will not work as you expected, as this is still a DSLR not a camcorder, if you need, go get GoPro 2 with 2048 pixel resolution.
So we are done with Autofocus, lets go to Metering/exposure
I'll like to talk about *b3 Easy exposure compensation mode (over written by (shooting/display -> *d3 ISO display and adjustment, Easy ISO). For me I tested and set it to ON. It will auto compensate the exposure whenever you shoot. If you dislike the amount you can goto b5 Fine tune optimal exposure, here you will be prompted, basically telling you that by the pressing of the 2 green button do not reset this area. Choose yes and you will see the menu to choose the amount of compensation for each metering (Matrix, Center and Spot.) So depending on your area, test it and set it, this will make shooting more fun.
Now under d Shooting/display, one thing here that I like to mention. it is the ISO display, this is to basically to let you see the ISO instead of your storage space. For me, I prefer to see the ISO, cos now the SD cards are affordable now.
With this I conclude my learning for now.
Monday, February 25, 2013
2013 - upgrading iphone4S To IOS6.1.2

1. Connect your iPhone to iTunes and do a backup
2. Put it on DFU MODE (10 sec both buttons and 30. Sec for home button) iTunes will prompt to say that your need to restore you iPhone in order to use. Cancel that message and shift click on the restore button in iTunes , choose your iOS pre-downloaded files. And it will start extraction
3. wait for it to complete the process.
4. Fom both iTunes and iPhone choose setup as new phones.
5. jailbreak if you wish then restore your previous backup, note to check the last backup your did, not the recent one auto backup from iTunes.
Sunday, January 20, 2013
2013 Simple blending with GIMP

For today -by looking of this picture i took using iphone 4s, it is
pretty good, but not to my liking. So I made come modification on it to become the picture below.

Final Picture - more impact and dramatic results.
First of all let me give you a short run though, then we go the pictures tutorial.
1. install GIMP @ www.gimp.org
2. load the original picture
3. duplicate it
4. open the levels and make the changes to the duplicated picture.
5. add layer mask
6. use the gradient tool
7. flatten the images
8. add contrast.
9. done.
phew! 9 simple steps to make a brilliant pictures. not bad.
lets continue with the pictures below.
Step 2 - Load the original pictures.
Step 3 - duplicate

Step 4 - Open the levels, apply level on the duplicated pictures
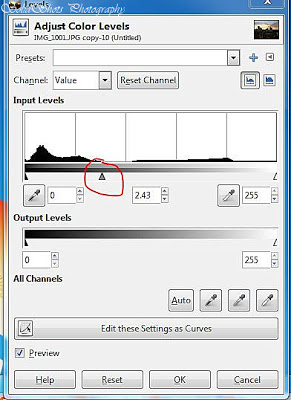
Levels Output

Step 5 - Add later mask
Choose default - White (full opacity)
How to add - right-click on the picture in the layer palette

You should see this when it is added in the layer palette

Step 6 - Use the Gradient Tool

Drag from the middle down - re-drag to fit your likings. below

Step 7 - Flatten the image

After flattening - pictures will be like below, all blown ed out.

Step 8 - adjust contrast - same here slide to your liking

9. Final
Thank you
Monday, November 21, 2011
How to make yourself attractive to anyone
1. Grooming Dr. Nicholson says that grooming is the most important variable when it comes to attractiveness, and can really make or break your chances with someone. Brush your teeth. Comb your hair. Shower. Keep your fingernails neat.
tips courtesy of: http://clovetwo.com/articles/story.asp?file=/2011/11/21/lovensex/20111121110821&sec=lovensex
2. Clothing Again, no matter what your personal clothing style is, neatness is of the utmost importance.
"The research says that three aspects of clothing are required to be attractive – neat, well fitting, and more formal. Put plainly, your clothes need to be clean, pressed, and well maintained."
Additionally, when it comes to attracting someone, it's better to be overdressed than underdressed.
3. Posture The easiest, cheapest, and best thing you'll ever do for your dating life is to simply stand up a little straighter. As Dr. Nicholson says, good posture is sexy.
4. Fitness Don't worry, you don't have to run out and get a personal trainer for a total body overhaul. You just have to, again, take relatively good care of yourself, which can be achieved with moderate exercise three times a week.
5. Attitude One of the most surprising finds of the study was that "pleasantness" rated pretty highly among both sexes. This means being happy, positive, and friendly in attitude.
tips courtesy of: http://clovetwo.com/articles/story.asp?file=/2011/11/21/lovensex/20111121110821&sec=lovensex
Tuesday, September 6, 2011
Format command - formatting HDD with for FAT32
Recently got a new HDD from a friend, and wanted to format it as FAT32...no no cannot...do some reading and found some requirement.
1. need to repartition your HDD at 31000MB (31G) per partition.
2. when you click next you will see and option listed "FAT32" nice!
3. click on quick format, (super computer can ignore this!!) else better be quick.
4. assign a lable
5. done
in DOS: use format : /FS:FAT32
here you go...thanks for reading.
Wednesday, July 20, 2011
How to choose a smartphone
It has been a tremendous battle place for Smartphones, brand like Apple,HTC,Blackberry,Samsung Galaxy and other makes that is trying to get into this market. So lets talk about the review for Smart Phones as major topic. So what is the thing that you would like to have when you want to buy a smartphones? is it like its design, colors, size, and mostly price. ....is it? Well there is a lot of choices in determined the smartphones that you want to buy, everybody have different needs and budgets. so lets list down some of the items that one would normally be looking for when choosing a smartphones.
for me I it would be
1. Reception!!
- you might ask why i say that?, well what is the whole point of a phone in general, to connect! and without connection what is it call? a Toy!...:D, see this component that is used to make this reception is vital, with a good quality chip would really make a nice day for you where everyone else having trouble connecting. Nowadays, everything is online, GPS, GOOGLE,news,stocks, word processor, spreadsheets, you name it, they have it online. Even to upgrade your phone OS you would need to be connected for your convenience. My personal experience, I am using laptop and we were on a public wi-fi, my sis is using smartphone, she can get connection, well i fail to even connect. there you go, see?
2. Battery
- power power power!, don't everyone agree with me? no power that smartphone is a piece of junk or monument for shelf to be displayed :).
3. Size
- I mean screen size, not too big not to small, just nice would be ok. For me it is about 10 to 11 inch max.
4. Weight
- let say here, about like 100-120 gram
5. Display
- 16 million colors would be sufficient more then that your eyes could not even differentiate the difference, so what is the point, also need to know that the LED,LCD is a power saving type, like AMOLED, or TFT, just make sure that this type of display is a power saving type would be ok.
6. OS
- this is also crucial, I am not particular in any OS brand, but the major ones are APPLE iOS and Android OS, as I am writing they are rolling gingerbread. why this matter?, OS design is very particular, for this you have to use that phone, try it, launch some word processor and see if the virtual keyboard is blocking how much of the document body. It would be a fuss when you cannot see what you are typing, right? I also had this experience with some of the TABs that I have surveyed around, while I am planning to get one. Well this also depends on people, as some of you are left handed, so try it first to see what is ergo to you.
7. Storage
- make sure you have sufficient storage and the speed of it. slow writes make a slow phone. I note that Iphone do not have external USB to connect external drives, well if you want to get that model, do get a higher storage model. Not sure if Apple is coming out with a cable that connect with an external drive, but what is the point? All need to use itunes. hmm. I have seen some companies are making readers that can connect to iphone and store data. If you need hugh storage, look for alternatives like those models that uses Andriod mostly have a USB port.
8. GPS - free?
- if your OS can support free GPS apps? would be nice.
9. Wifi
- to get connected of course.
10. 3G/4G/5G
11. processor
- dual core 1Ghz would be good.
Saturday, November 6, 2010
camera flash lightings techniques


Perform a test after reading some site about using the aperture to control the lights, by setting the flash to manual mode. Indeed success. here are some examples above. Well what i meant here is that when you set the falsh to manual and you just need to control the lighting using the aperature dial, but first setup your mode to Aperature priority.
The settings for the above pictures if you cannot see it.
1. 1/60sec flash 1/4 manual, F8
2. 1/60sec, flash 1/4 manaul, F4
3. 1/60sec, flash 1/4 manual, F2.8
i just use the aperature dial to twick the lightings. try it! sure you like it.
This one shot with Tammy 17-50VC 2.8 :D
Subscribe to:
Posts (Atom)